Raspberry Pi reads DHT11 via Arduino
DHT11 is a widely used humidity/temperature sensor. If you try to use DHT11 on Raspberry Pi, you will see it is not easy to achieve a good result. The DHT11 sends out its data with very high speed, the pulse for one bit is just 26us~70us. In order to read all the bits, you may have to keep checking the data pin in a loop with very short interval. As a result, the CPU usage of your Pi will go high when your application talks to DHT11, and all other applications on the Pi will have to compete with yours little application in that period (although it is not long). Please notice that Raspberry Pi is not running a real-time OS, so when others are competing with you for CPU resource, your readings in loop will not be regular and you may miss one or more bits, and then get a checksum verification failure at the end, or a timeout if you miss too much data.
This problem could be solved by using Arduino with Raspberry Pi together, and deploy the UUGear solution on both sides. By using the UUGear solution, your application on Pi can not only access all the pins on Arduino, but also the DHT11 sensor connected to it!
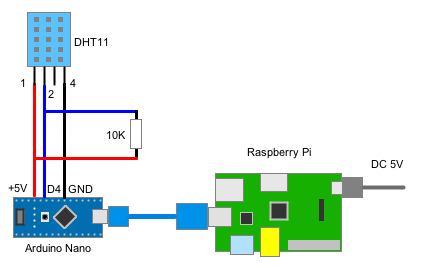
The Wiring
The wiring is very simple, just use USB cable to connect Arduino Nano and Raspberry Pi, wire DHT11’s pins to VCC, D4 and GND on Arduino, and don’t forget the pull up resistor between VCC and DATA pin.
 The Source Code
You can write your application in C or Python, as UUGear solution provides APIs for both languages. After finding the Arduino device by its unique, constant id, your application can then read DHT11 data directly. Don’t know how to get the Arduino device id? Please read the project homepage.
The readDHT11() function is a blocking function, and it will return in about 26ms. The return value contains the temperature (degree centigrade) on lowest byte and the humidity (percentage) on higher byte.
Here is an example in C:
#include <stdlib.h>
#include <stdio.h>
#include <string.h>
#include <sys/stat.h>
#include <sys/types.h>
#include <mqueue.h>
#include <unistd.h>
#include <sys/time.h>
#include <time.h>
#include "../../src/UUGear.h"
int main(int argc, char **argv)
{
	setupUUGear();
	setShowLogs(0);
	UUGearDevice dev = attachUUGearDevice ("UUGear-Arduino-7853-2668");
	if (dev.fd != -1)
	{
		int i;
		for (i = 0; i < 200; i ++)
		{
			time_t mytime = time(NULL);
			int value = readDHT11(&dev, 4);
		    printf(ctime(&mytime));
			printf("H: %d%%  T: %dC\n", value >> 8, value & 0xFF);
			sleep(1);
		}
		detachUUGearDevice (&dev);
	}
	else
	{
		printf("Can not open UUGear device.\n");
	}
	cleanupUUGear();
    return 0;
}
The same example in Python is below:
from time import sleep
from UUGear import *
from time import gmtime, strftime
UUGearDevice.setShowLogs(0)
device = UUGearDevice('UUGear-Arduino-7853-2668')
if device.isValid():
	for i in range(200):
		value = device.readDHT11(4)
		humidity = (value >> 8)
		temperature = (value & 255)
		print strftime("Time: %H:%M:%S", gmtime())
		print 'H:', humidity, '%  T:', temperature, 'C'
		sleep(1)
	device.detach()
	device.stopDaemon()
else:
	print 'UUGear device is not correctly initialized.'
Both are very simple 🙂
You may noticed that I put one second delay in the loop. It is recommended to do so because DHT11 may not work correctly if you pull data from it too frequently. Experiment shows that querying DHT11 per second is very safe and it will never fail.
Video Demo
Here is a video to demonstrate the result. You can monitor the humidity and temperature in real-time, via an application running on Raspberry Pi!
Conclusion
Using Arduino as an extension of Raspberry Pi can not only get more GPIO pins, but also make good use of those components designed for Arduino. In this example, Raspberry Pi can read humidity and temperature from DHT11 sensor via Arduino, with 100% reliability, and very low CPU usage. The result is quite satisfying.
