Update on 2021.03.15: We have released a document for more details about updating firmware for Witty Pi 3 board. You can find it here.
Witty Pi 3 and Zero2Go Omini use an AVR microcontroller (ATtiny841) and their firmware are developed with Arduino IDE. We have released the source code of their firmware on Github. This tutorial is about how to update firmware to the ATtiny841 microcontroller on Witty Pi 3/Zero2Go Omini. You can also use the method introduced in this tutorial to upload any sketch to Arduino board from your Raspberry Pi.
Programmer Wiring
If you want to upload a newer firmware to Witty Pi 3 or Zero2Go Omini, the most straight forward way is to use a USB programmer (e.g. USBasp). Witty Pi 3 comes with an unpopulated standard ICSP (in-circuit serial programming) or ISP header, which is the same as the one you can find on those Arduino boards. If you have an USB programmer on hand, you can solder a male 2.54mm 2x3P header on Witty Pi 3 and then connect the USB programmer to it. Zero2Go Omini doesn’t come with such an unpopulated header, but it has 6 testing points on the back that have exactly the same functionalities (MOSI, MISO, SCK, RESET, VCC and GND), so you can solder wires to connect Zero2Go Omini to the programmer.
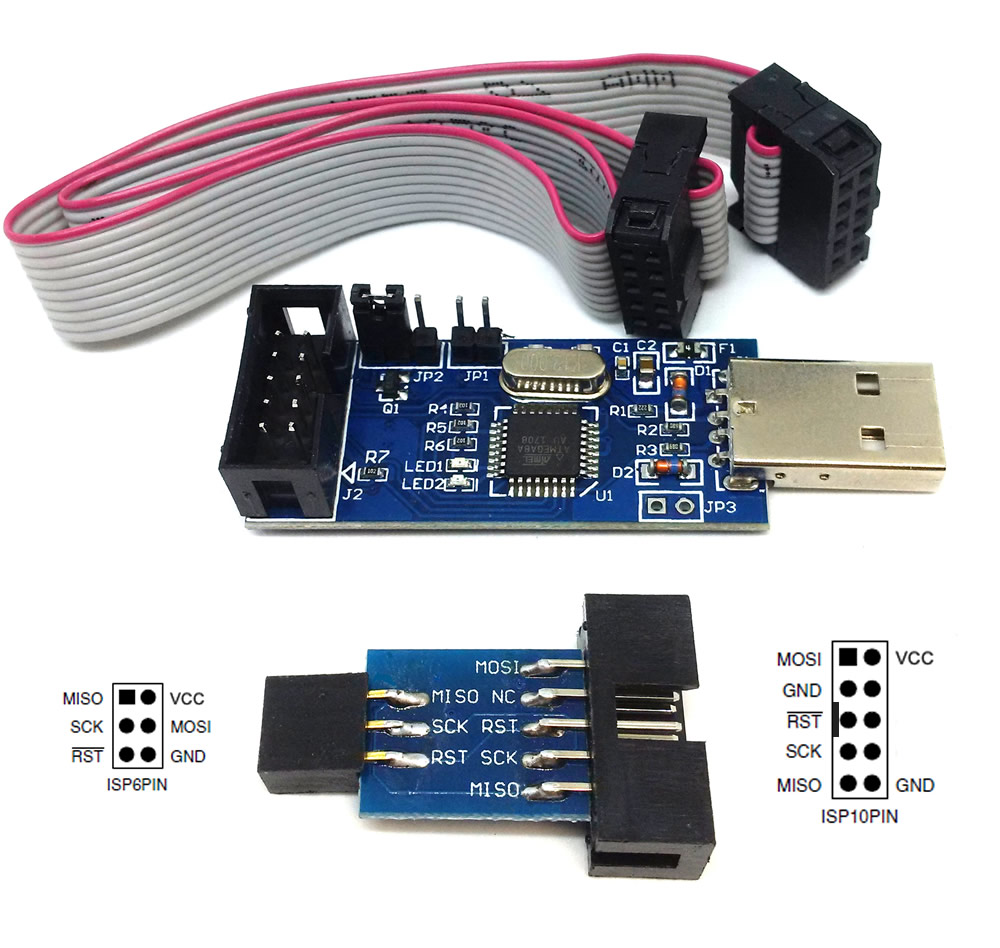
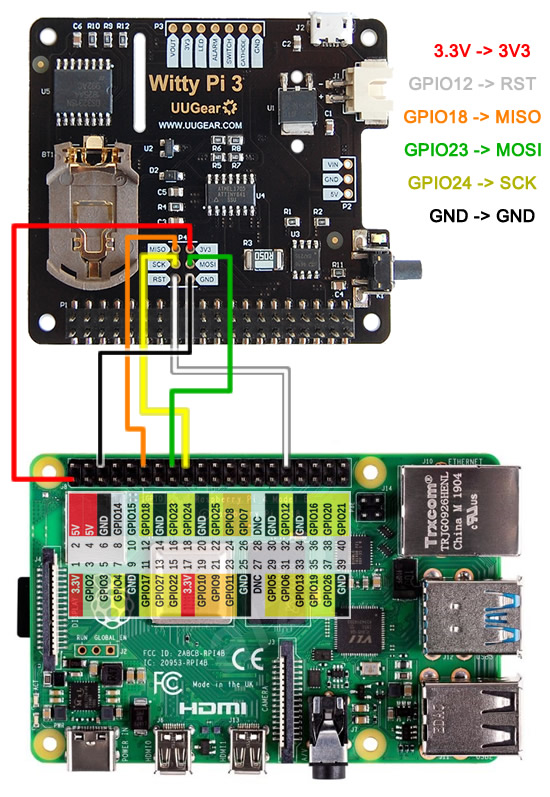
If you don’t have any USB programmer, the job can still be done as long as you have a Raspberry Pi (any model will do)! You will use 4 free GPIO pins in your Raspberry Pi to emulate an ICSP programmer. Here we use GPIO-12, GPIO-18, GPIO-23 and GPIO-24 (BCM naming), if you want to use different GPIO pins, just change the wiring and configuration accordingly.
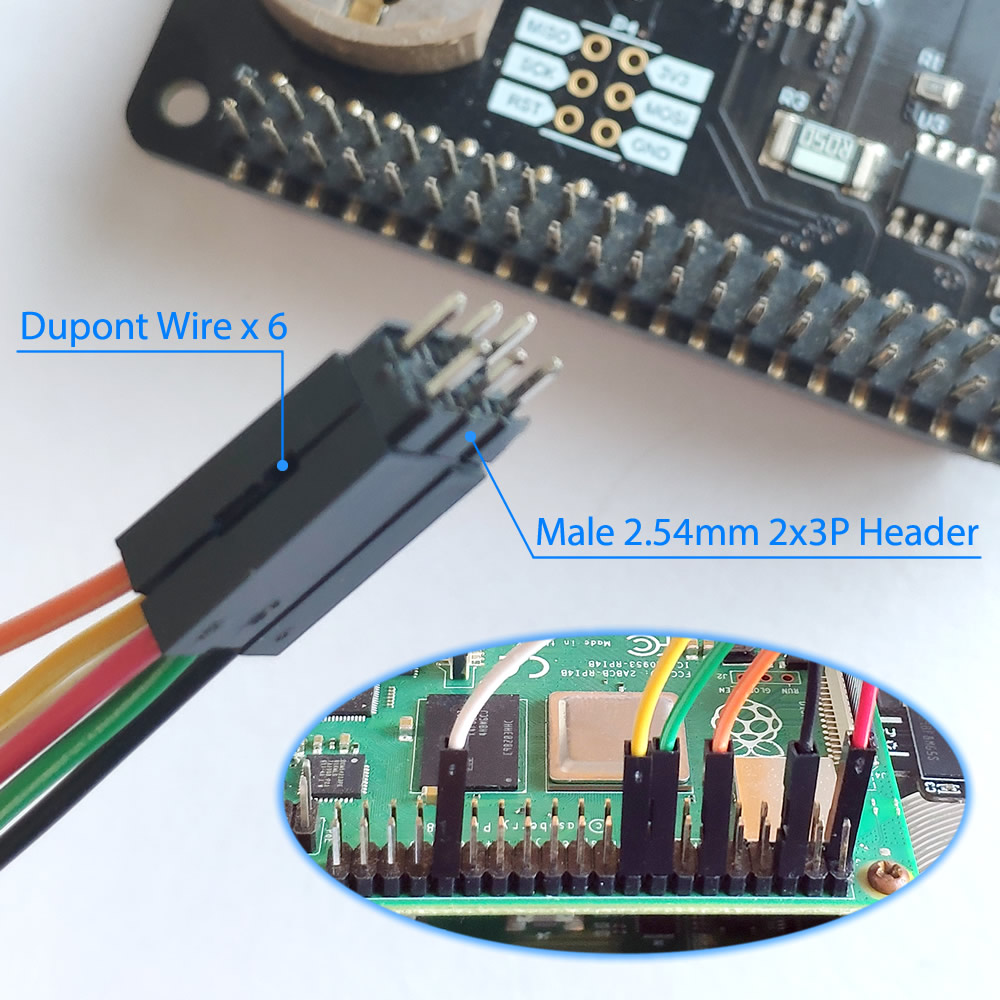
If you have multiple units that need to update firmware, you may not want to solder the 2×3 header one by one. You can connect the 2×3 header with 6 Dupont wires, and use them together as a “firmware updating plug”. When you upload the firmware, you just need to temporarily insert this plug to its footprint on Witty Pi 3, and then gently press the plug from one side, so all 6 pins will well contact to Witty Pi 3. After finish uploading the firmware (about 10 seconds), you can move to another unit.
Software Installation and Configuration
In order to upload firmware to the microcontroller (ATtiny841), you need to install avrdude. Just run this command in your Raspberry Pi:
sudo apt-get install avrdude
After the installation, you can run this command to confirm the version of avrdude you have:
avrdude -v
You will see something like this:
avrdude: Version 6.3-20171130
         Copyright (c) 2000-2005 Brian Dean, http://www.bdmicro.com/
         Copyright (c) 2007-2014 Joerg Wunsch
         System wide configuration file is "/etc/avrdude.conf"
         User configuration file is "/home/pi/.avrduderc"
         User configuration file does not exist or is not a regular file, skipping
avrdude: no programmer has been specified on the command line or the config file
         Specify a programmer using the -c option and try again
......
If you are going to use Raspberry Pi’s GPIO as programmer, your avrdude version should be 6.1 or above, because avrdude versions before 6.1 doesn’t support “linuxgpio” programmer, which is what we will need.
If you will use a USB programmer like USBasp, you can skip the configurations below, otherwise please read on.
You need to tell avrdude that you are using GPIOs as programmer. The default configuration file for avrdude is /etc/avrdude.conf, but it is better not to modify this file directly. You can make a copy of this file in your home directory, and then edit that copy:
cp /etc/avrdude.conf ~/avrdude_gpio.conf
nano ~/avrdude_gpio.conf
At the end of that the file (it is a very long file by the way), you append these lines:
# Linux GPIO configuration for avrdude.
# Change the lines below to the GPIO pins connected to the AVR.
programmer
  id    = "RasPi";
  desc  = "Use the Linux sysfs interface to bitbang GPIO lines";
  type  = "linuxgpio";
  reset = 12;
  sck   = 24;
  mosi  = 23;
  miso  = 18;
;
To quit nano you press Ctrl+X, and then press Y and Enter to save the file.
You can then run this command to verify the configuration:
sudo avrdude -p attiny841 -C ~/avrdude_gpio.conf -c RasPi -v
If everything is OK, it will print something like this:
avrdude: Version 6.3-20171130
         Copyright (c) 2000-2005 Brian Dean, http://www.bdmicro.com/
         Copyright (c) 2007-2014 Joerg Wunsch
         System wide configuration file is "/home/pi/avrdude_gpio.conf"
         User configuration file is "/root/.avrduderc"
         User configuration file does not exist or is not a regular file, skipping
         Using Port                    : unknown
         Using Programmer              : RasPi
         AVR Part                      : ATtiny841
         Chip Erase delay              : 4500 us
         PAGEL                         : P00
         BS2                           : P00
         RESET disposition             : possible i/o
         RETRY pulse                   : SCK
         serial program mode           : yes
         parallel program mode         : yes
         Timeout                       : 200
         StabDelay                     : 100
         CmdexeDelay                   : 25
         SyncLoops                     : 32
         ByteDelay                     : 0
         PollIndex                     : 3
         PollValue                     : 0x53
         Memory Detail                 :
......
It should not print any error, otherwise please check the configuration according to the error message.
Upload the Firmware
The firmware is a .hex file, and it can be downloaded from GitHub repository for the product’s firmware. In the same repository you can also find the source code of firmware.
Assume you have downloaded Witty Pi 3’s firmware to ~/WittyPi3.ino.hex. If you are using USBasp programmer, you can use this command to upload it to your Witty Pi 3:
sudo avrdude -p attiny841 -C ~/avrdude_gpio.conf -c usbasp -v -U flash:w:~/WittyPi3.ino.hex:i
If you are using Raspberry Pi’s GPIOs as programmer, you can run this command instead:
sudo avrdude -p attiny841 -C ~/avrdude_gpio.conf -c RasPi -v -U flash:w:~/WittyPi3.ino.hex:i
After finish uploading, you can mount Witty Pi 3 on your Raspberry Pi and then verify the firmware ID with this command:
i2cget -y 1 0x69 0
It will print a hexadecimal number (e.g. 0x22). If this number matches the firmware ID labelled on the firmware file you downloaded, then you know you have successfully updated the firmware to your device.
Update on 2021.03.15: We have released a document for more details about updating firmware for Witty Pi 3 board. You can find it here.