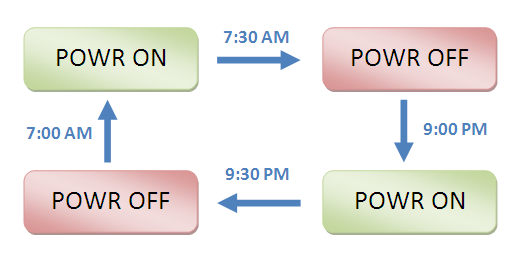
As you may already know, the RTC chip on Witty Pi (DS1337) has only two alarms. We used one of them for auto startup and the other one for auto shutdown. So the typical use case of Witty Pi is to setup a startup time and a shutdown time. Thanks to the wildcard supported since V1.50 of software, you can make repeatable schedule. You can turn on/off Raspberry Pi at a specific moment everyday, or every hour. It is good, but not good enough. What if you wish to turn on your Raspberry Pi on 7:00 AM, turn it off on 7:30 AM, turn on again on 9:00 PM and turn off again on 9:30 PM? And you wish it to repeat everyday? Is it even possible?
It was not possible in the past, but now it becomes a very easy task, thanks to the schedule script supported by V2.00 of software. Here we want to thank Daniel Metz, he shared his idea to programmically reschedule incoming startup/shutdown on Witty Pi. Although the final solution comes out a little different than what he suggested, he should still be credited. Please be proud Daniel 🙂
What is Schedule Script?
We invented a very simple scripting language for defining the schedule of how to turn on/off your Raspberry Pi. A text file that has schedule defined in this scripting language is called schedule script. Usually a schedule script should have a “.wpi” file extension, which stands for “Witty Pi” or “Witty Pi Programming Interface”.
Using schedule script can define very complex ON/OFF sequence for your Raspberry Pi. There are some schedule script examples in the “schedules” directory, they could be chosen and activated by wittyPi.sh. You can define your own schedule script too!
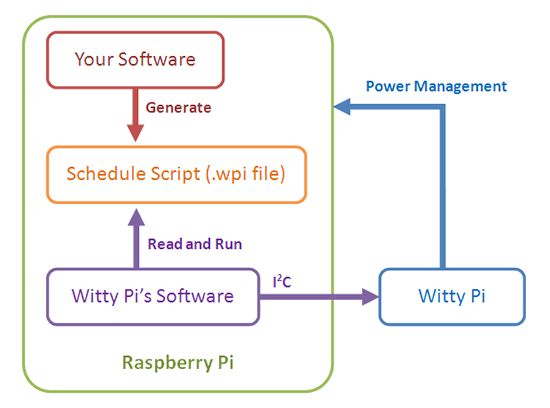
There is something even more exciting, schedule script could be used as an interface to integrate Witty Pi and your own software together. You don’t have to read DS1337 datasheet anymore to understand how Witty Pi’s software works. As long as your program can output schedule script file, your are actually programing Witty Pi.
There are so many things you can do on it! Think about the visual scheduler and remote scheduler on web, they are not difficult to implement now. Your robot may even adjust the schedule with an awesome algorithm, amazing vision, isn’t it?
How Schedule Script Works?
If a schedule script is copied to the install directory of Witty Pi, and has file name “schedule.wpi”, Witty Pi’s software will automatically read and run it every time after your Raspberry Pi wakes up. The flowchart below shows how the script works:
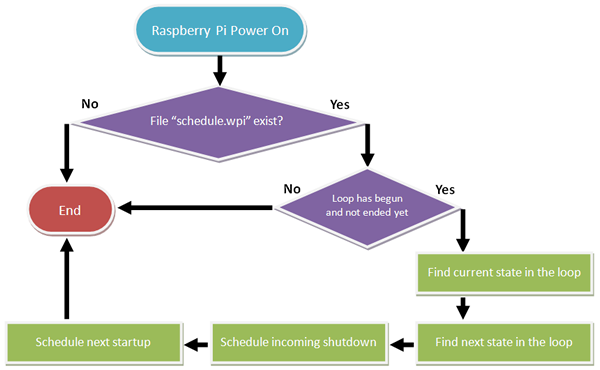
The schedule script defines a loop with begin and end time specified. All states (ON or OFF) and their duration will also be defined in the script. A simple schedule script looks like this:
# Turn on Raspberry Pi for 5 minutes, in every 20 minutes
BEGIN	2015-08-01 00:00:00
END	2025-07-31 23:59:59
ON	M5	# keep ON state for 5 minutes
OFF	M15	# keep OFF state for 15 minutes
The script parser (“runScript.sh”) will check if the current time is in the time range for the loop, if so it will try to locate the current state in the loop, by accumulating the durations of states. Once it finds the current state (must be an ON state, since Pi is on when parser is running) , it will also locate the next state (must be OFF). Then it will schedule the incoming shutdown at the end of the current ON state, and the next startup at the end of next OFF state.
If the current time doesn’t reach the begin time of the loop yet, or it already exceeds the end time of the loop, the schedule script will be ignored.
How to Use Schedule Script?
To use schedule script, you need to have Witty Pi software version 2.00. If you are new to Witty Pi, you can get the latest software by running the installing script, and no need to upgrade.
wget http://www.uugear.com/repo/WittyPi/installWittyPi.sh
sudo sh installWittyPi.sh
If you have ever installed the older version of software, you can remove or rename the “wittyPi” directory and then run the installing script again (so new version will be downloaded and installed).
mv wittyPi wittyPi_bak
wget http://www.uugear.com/repo/WittyPi/installWittyPi.sh
sudo sh installWittyPi.sh
If you run “sudo ./wittyPi.sh”, you will the see the correct version number shows up, and the 5th listed option is “Choose schedule script”. That means you are ready to go.
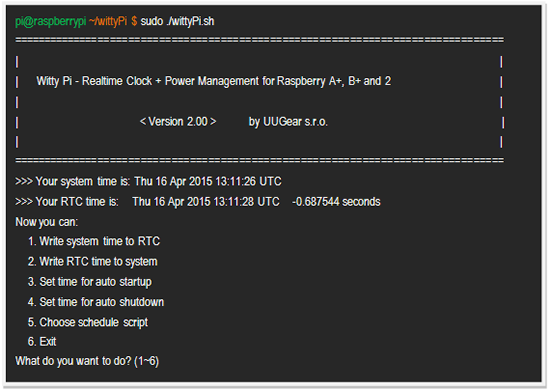
If you input “5” and press ENTER, the software will list all schedule scripts in the “schedules” directory. You can then choose one from the list.
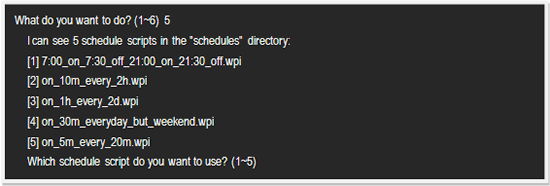
From the file name you can guess what the script will do. Obviously the first schedule script (7:00_on_7:30_off_21:00_on_21:30_off.wpi) is for the scenario with state-chart at the beginning of this post. Let’s choose this schedule script:
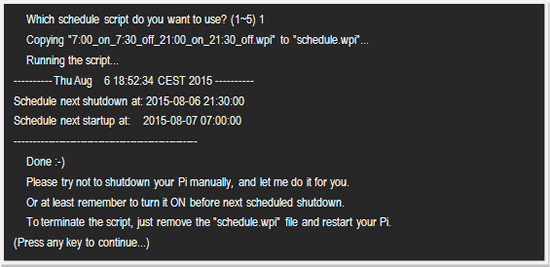
As you can see, the schedule script gets copied to “schedule.wpi” under the install directory, and the next shutdown and startup also get scheduled. When the scheduled startup comes (7:00 AM next day), the script will be run again and make schedule accordingly.
Please also notice the message after the scheduling. If you are using schedule script, please do not turn off your Raspberry Pi manually, and just let the scheduled shutdown comes. Otherwise your Witty Pi may enter a dead lock status and you will need to rest it then (remove battery and power supply).
How to Create Schedule Script?
Schedule script is just a text file, so you can use any text editor to create and edit it. As for the syntax of the scripting language, it is quite simple.
Like many other scripting language, Witty Pi schedule script also uses “#” to make single line comment.
A schedule script defines a loop, and there are at least one ON state and one OFF state in the loop. All states need to have their durations specified. Let’s take a look at a simple schedule script:
# Turn on Raspberry Pi for 5 minutes, in every 20 minutes
BEGIN	2015-08-01 00:00:00
END	2025-07-31 23:59:59
ON	M5	# keep ON state for 5 minutes
OFF	M15	# keep OFF state for 15 minutes
Excluding the first line as comment, the first two lines define the time range for executing the script. Please make sure to use the correct time format (YYYY-mm-DD HH:MM:SS) here. You can use one or more white characters (space or tab) between BEGIN/END and the time string.
The rest of the script defines the states in the loop. It could be “ON” or “OFF”, and you should define at least one “ON” and one “OFF” states in the loop. Usually the ON and OFF states are used in pair. You should also specify the duration of each state. You can do so by putting one or more parameters after ON/OFF, separated by space or tab. Each parameter starts with a capital letter and follows by a number, where the capital letter is the unit of time:
- D = Days (D2 means 2 days)
- H=Hours (H3 means 3 hours)
- M=Minutes (M15 means 15 minutes)
- S=Seconds (S30 means 30 seconds)
For example, if you wish to define an ON state for one and a half hour, you can write:
ON H1 M30
When the script engine executes this line, it will actually schedule a shutdown at the end of the ON state.
If you wish to define an OFF state for two days, you can write:
OFF D2
When this line gets executed, an incoming startup will be scheduled at the end of the OFF state.
There are some schedule scripts in the “schedules” directory, and they all have comments inside to explain themselves. You can take them as example to learn how to create the Witty Pi schedule script.
Conclusion
With the new version of software, we can use schedule script to define complex schedule for Witty Pi, and perfectly workaround the limitation from hardware. It is much more than that, the schedule script can also be used as inter-layer language, so you can program your Witty Pi without knowing much technical details of how its software works.